Repair Kit – Small but Important

At service stations, you often hear the phrase "you need to replace the repair kit." What is this kit, and what happens if you don't replace it?
What is a Repair Kit?
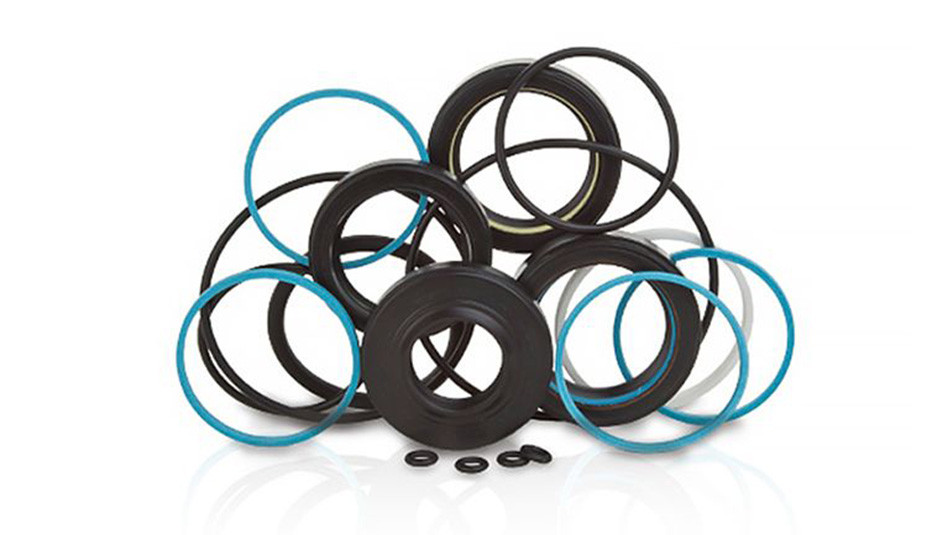
A repair kit is a set of plastic, metal, and rubber components that protect the steering mechanism of the steering system from water, sand, and corrosive agents. Repair kits are used for minor or partial repairs, including servicing work.
In the steering system regeneration, the following replacement kits are commonly used:
- Steering racks with HPS and EPS
- Non-power-assisted steering rack
- Gearbox with HPS
- Separate hydraulic power steering pumps.
Available Repair Kits
The content of repair kits may vary. A standard repair kit for power-assisted steering racks with hydraulic support typically includes:
- Two high-pressure oil seals that withstand oil pressure.
- Support sleeves holding the rack bar (usually made of plastic).
- Bearings (in an extended kit).
- Rubber rings on the rack bar sleeve.
- Teflon rings placed on the piston.
A gearbox with hydraulic power steering has its own repair kit:
- Set of balls for the worm.
- Oil seals.
- Teflon rings.
- Rubber rings.
- Seal.
A non-power-assisted steering rack is simpler – the repair kit includes rubber rings and a support bushing.
For the hydraulic power steering pump, a separate repair kit is available, consisting of:
- Oil seals.
- Gaskets.
- Rubber rings.
- Bushing.
Replacing the EPS steering rack kit is complicated as it requires significant effort in assembly and disassembly. If you're replacing the repair kit for EPS, be prepared to order an additional bushing (if, for example, it is made of bronze). There is no DIY method for replacing the repair kit for EPS steering racks.
Repair Kit for Mechanical Steering Rack
What's in the Repair Kit, and How Do Components Wear Out?
Now that we know why a repair kit is needed, what are the specific purposes of each component?
Seals: Rubber sealing parts that seal steering rack components. There are two types of seals: standard and high-pressure. High-pressure seals are used where excessive pressure occurs, such as in the power steering cylinder.
Seals can wear out due to:
- Mechanical friction.
- Chemical degradation from constant contact with oil.
- Seal leakage due to high pressure, caused by a mismatched pump or incorrect repair kit.
Support Bushing: A part that supports the rack and prevents the rack bar from loosening.Bushings come in various materials: bronze (commonly used in EPS), steel, plastic, and rubber.
Reasons for bushing damage:
- Mechanical wear.
- Improper repairs.
Bearings (Ball Bearings): Provide axial rotation of the pinion Similar to oil seals, bearings undergo mechanical wear.
Rubber Rings: Seal connections in the steering mechanism. They are resistant to chemical wear but not to mechanical wear. Over time, they wear out due to temperature fluctuations.
Teflon Rings: Similar to rubber rings but better due to the polymer composition – they provide effective sealing and withstand high temperatures. Their weakness is mechanical wear.
Next in line are seals. They are used in the steering rack and hydraulic gear, in the pump – wherever there are working fluids and oil. Seals are responsible for the integrity of the entire device, and they are affected by chemical and mechanical influences.
Balls are used in steering systems to turn rack bars. However, heavy usage can cause the balls in the gear to crush or flatten. If one ball flattens (or comes out), the rest will also fall out. In this case, the gear stops working, and the steering system fails. A similar situation occurs with balls in bearings: if one ball is crushed (flattened), all of them fall out. Apparently, this is herd instinct.
Symptoms of Damaged Seals (Teflon and Rubber Rings, Seals, High-Pressure Seals):
- Knocking or grinding under the hood.
- Oil leaks.
- Significant oil consumption.
- Symptoms are too general, and drivers often cannot determine which parts are worn out independently. Therefore, a reasonable decision is to visit a service station for diagnosis.
How to Replace the Repair Kit
Some car enthusiasts try to replace the repair kit themselves – either out of a passion for DIY repairs in the garage or an attempt to save money. As we mentioned, it's better not to complicate things with EPS and go to a service station.
Now, let's take an HPS steering rack. You need to remove it from the car, disconnect the tie rods, remove the covers – now the rack is ready to replace the repair kit.
Starting with the distributor part:
- Remove the pinion cover and securing ring.
- Remove the plug and nut from under the pinion.
- Unscrew the adjustment nut, remove the rubber sealing ring, and behind it, CAREFULLY knock out the side handle.
- Carefully knock out the pinion, remove the seal and bearing, and see their condition.
Now, we can move on to the part with the rack bar:
- Remove the support bushing.
- Pressing from the pinion side, push out the rack bar and seal from the housing.
- Pull out the rack bar.
Before replacing the repair kit, check the condition of the rack body and housing (also in the pinion part) – they should be free of wear and corrosion. Now, attention, replacing the kit:
- Lubricate the housing from the inside, lubricate the socket for the new bushing, and the bushing itself – this is important.
- Replacing the pinion kit: install new Teflon rings. Note: Teflon seals stretch slightly after installation, so tighten them. Set aside the pinion.
- Press in the lower oil seal.
- Place a new high-pressure seal into the steering rack bar housing.
- Insert the rack bar into the housing, place the second seal on the rack bar, and insert the bushing with new O-rings. Place the pinion back in its place.
- The rack bar should be turned with the teeth towards the worm. Lubricate the worm and carefully slide it into place.
- Mount the bearing, upper seal, locking ring, cover, and replace if necessary.
- Secure the steering rack and turn it in the vise to mount the side handle.
- Tighten the lower nut.
After all manipulations, don't forget to adjust the steering rack.
The most important thing in this type of repair is a successful disassembly and reassembly of the steering rack. Some actions require special tools: clamps, pins, seal pullers, and bushing pullers. When installing oil seals, it's important to keep them straight and not to damage them; otherwise, they won't seal the power steering cylinder hermetically. Also, during the disassembly and assembly of the repair kit, it's important not to scratch the rack bar or housing surfaces – don't forget that the hydraulic power steering rack must be hermetically sealed.
In most cases, the steering rack will not function after a makeshift replacement of the repair kit in the garage. Disappointed drivers go to the service station to replace the repair kit and later buy a new steering rack.
The result of such "repair" is amusing for car mechanics when they receive a damaged rack that eventually cracked after a garage repair. They have to correct the mistakes of home masters in places where they could have done it at a lower cost.
Don't do this. Don't risk the condition of your mechanism, don't skimp on your safety. As the saying goes, a miser pays twice.


